
Audacity is a free and open-source digital audio editor and recording application software.

This tutorial is suitable for producing a podcast where you talk over a music background or have to talk interspersed with music.
(This tutorial assumes you know how to connect your microphone to your computer and get the sound into Audacity. If you have not got that far yet, please read this tutorial).
- Microphone position for voice recording
- Record the narration
- Editing the narration
- Import the background music file
- Moving the tracks
- Adjust relative volume levels
- Smooth fade of the background music
- Save and export
- Backup
Microphone position for voice recording
- Try to place the microphone so that it picks up a minimum of computer noise (hard drives, fan).
- When speaking into the microphone, point the microphone at your mouth but do not point your mouth at the microphone.
- If you can, place the microphone so that you are talking past it.
- Setting up the microphone so that it is level with your mouth but a little off to the side also works. This avoids «popped p’s» and other breath effects from ruining your recording.
- Finally, try to set up the microphone so that it is 4 to 6 inches away from your mouth.

Record the narration
Step 1. Start Audacity.
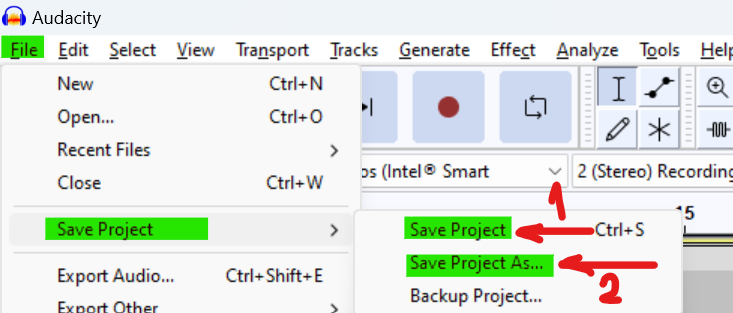
Step 2. Click on File > Save Project > Save Project or File > Save Project > Save Project As and name your project.
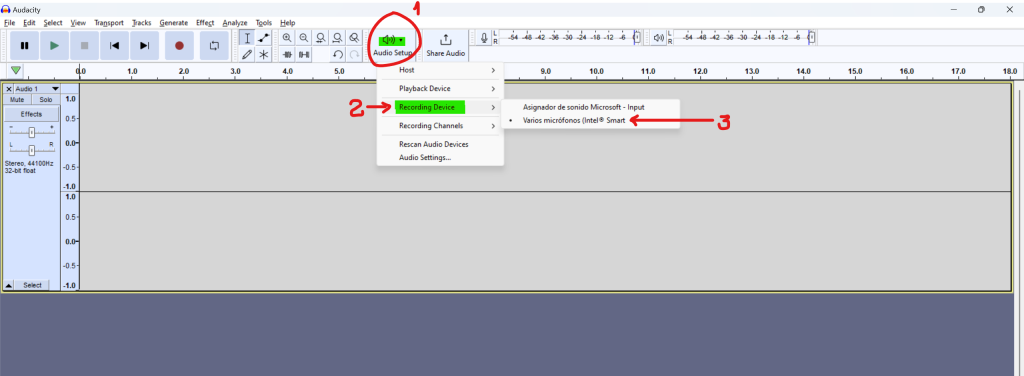
Step 3. Set the recording device to your microphone in Audacity’s Device Toolbar.
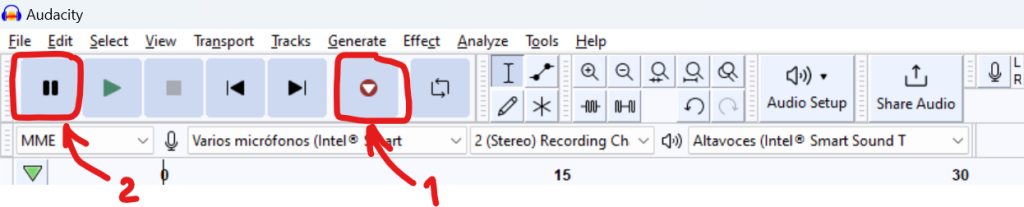
Step 4. Click the Record (1) button ![]() in the Transport Toolbar.
in the Transport Toolbar.
Do not worry about mistakes – you can edit those out later. When you stop to make a correction, go back to the start of a natural break and start again in a normal voice.
Editing the narration
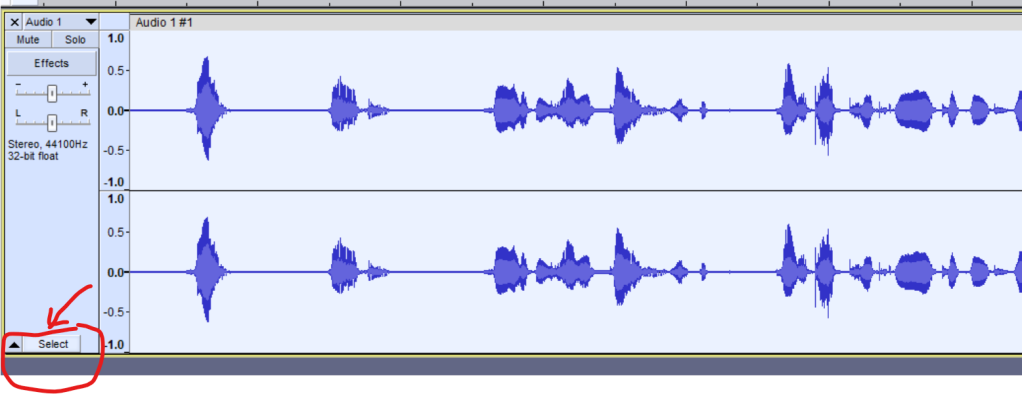
Step 5. When you have finished recording, press the Stop button and save your recording into the Project you started by using File > Save Project > Save Project.
Now the data is safe, you can edit it in Audacity.
Cutting out the mistakes
As you can see, the portion to be removed is selected. Press the C key to hear two seconds of audio before, and one second of audio after the selection («Cut preview«). Adjust the length of the selection until the edit sounds natural.
When you are happy with the selection, press the Delete key.

Continue correcting the mistakes until you are satisfied with the end result.
Don’t forget to save your work!
Leveling out the volume
There will be level (volume) variations during your narration. To level it out, use the Compressor effect:
Step 1: Select the entire track.
Step 2: Choose Effect > Compressor.

Check and set the values and click «Apply».

Listen back to the result:
- Are the quiet parts still too quiet? Choose Edit > Undo Compressor and try again with a Threshold setting of -18 dB.
- Does your voice sound unnaturally squashed? Undo and try again with a Threshold setting of -6 dB.
When you have your narration edited to your liking, save your project.
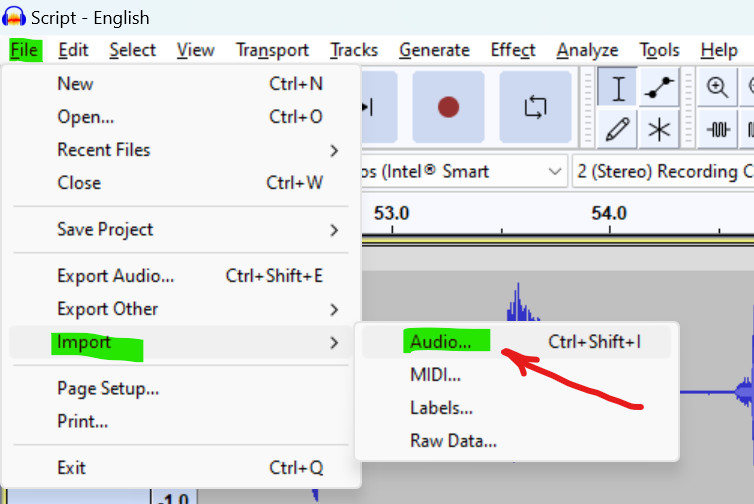
Import the background music file
Choose File > Import > Audio and open the background music file you have chosen for the project.
Audacity imports the music file into your project and puts it in its own stereo track:

Click the Skip to Start button (1), then click the Play button (1). Click the Stop button when you have heard enough (3).

Moving the tracks
You can move clips:

Cutting the narration track
We want to cut the narration into separate segments. Each of these segments will begin when the music makes a dramatic change.
Find the spot between the first and second portions of the narration (1).
Using the Selection Tool click at this point (1). Choose Edit >Audio Clips > Split (Ctrl+I) (2):

Similarly, put a split point between the other portions of the narration (Ctrl+I).
The narration track will now look something like this:

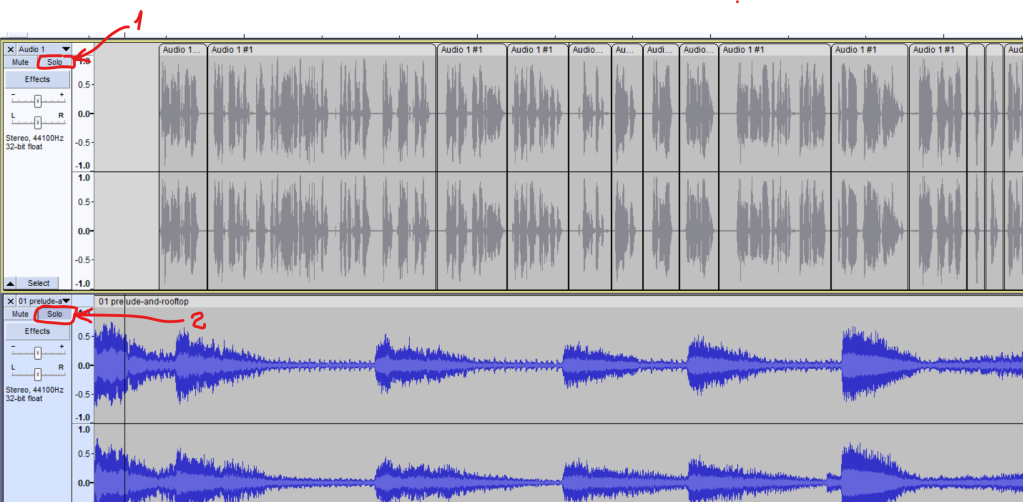
Marking the places in the background music track
Click the «Solo» button on the narration track (1) to turn off the Solo function on that track. Click the «Solo» button on the background music track (2) so you will only hear that track.
Identify the point in the background music track where you want the narration to begin. Click at that point with the Selection Tool (1). Choose Edit > Labels > Add Label at Selection (Ctrl+B) (2).

Type a name for the label, for example «First Narration»:

Similarly, identify the points in the background music track where you want the other narration clips to begin, and create labels at those points (Ctrl+B).

Moving the clips to work with the music
Click the Solo button on the background music track to turn off the Solo function on that track, so we can hear both the narration and music tracks.
Drag the narration clip using the Clip-handle drag-bars.
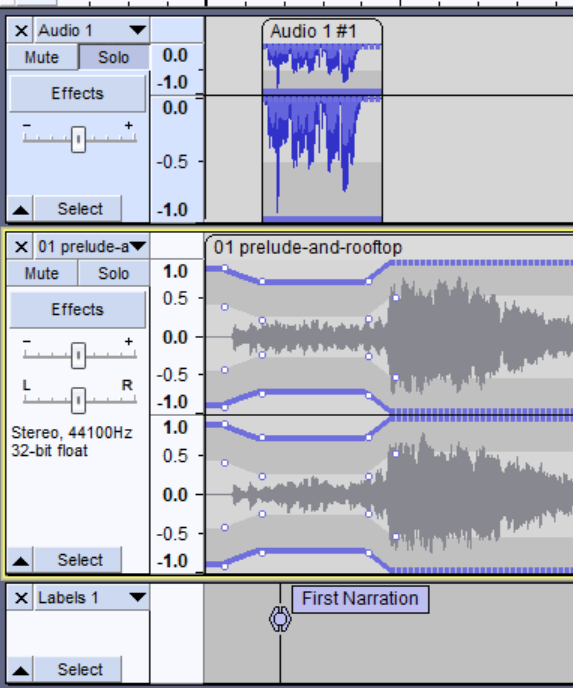
Your project window should now look something like this:

Adjust relative volume levels
It is now time to adjust the volume of the background music so your listeners can hear what you are saying.
Using the Envelope tool
Zoom in on the first narration clip.
Select the Envelope Tool from the Tools Toolbar.

In the music track, click to create control points. Drag the control points to adjust the length and depth of the fade you want:
Smooth fade of the background music
The music probably goes on for some time after the narration is finished. In this case you will want to fade out the music.
- Using the Selection Tool, click in the music track at the point where you want the music to be completely faded out.

- Choose Select > Region > Cursor to Track End. Press the Delete key.

- Now click at the point where you want the music to begin fading out.
- Again choose Select > Region > Cursor to Track End, then Choose Effect >Fading>Fade Out.

Your project window should now look something like this:

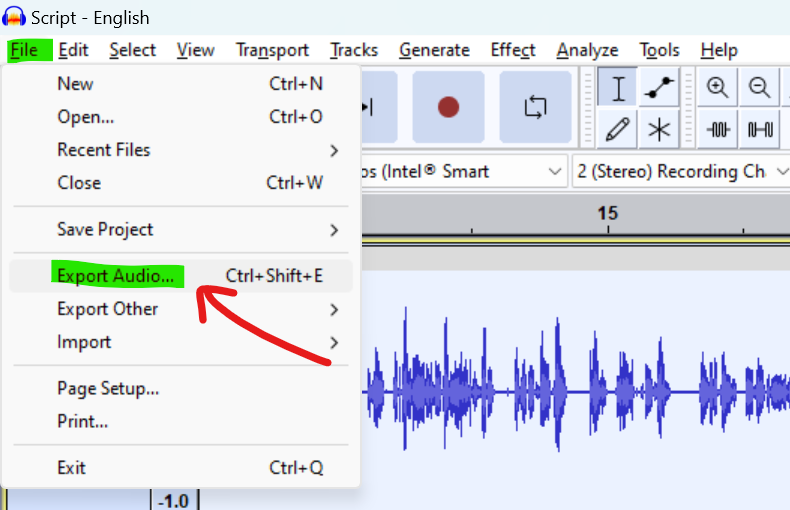
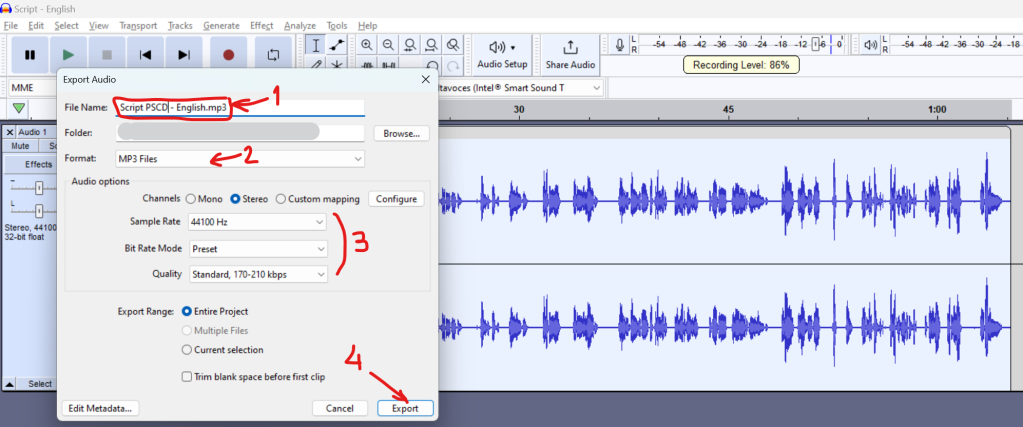
Save and export
When you are happy with your editing, you need to export the recording as an audio file such as WAV or MP3. To export a single audio file, use the File>Export Audio command.
Backup
Backup your exported WAV or MP3 files – you do not want to lose all that valuable work and have to do it all over again, do you?

Deja un comentario